
Integrating a comment system which cares about your privacy into ghost - Part 1
Part 1, How to add Isso comment system to your ghost blog.
(As long as you have your own server. If you are wondering when I get to actually installing Isso, scroll down to the next heading to get straight into the nitty-gritty).
People are finally starting to care about privacy, tracking cookies, and (online) personal security after the many privacy breaches. I myself did a one month trial on no blocking software of any kind. No tracking blocking, no ad blocking, no private browser, just vanilla firefox + using Lightbeam addon to ‘track the trackers’.
Here is what my data looked like after 1 week with tracking scripts and ad block enabled (61 Sites, with 157 third parties):
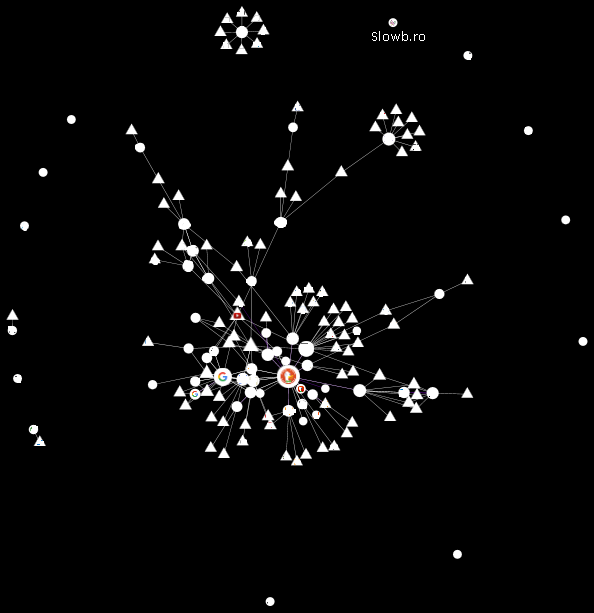
And here is what it looked like after 1 month of no blocking scripts or private browsing (127 sites, with 368 third parties):
![]()
- Circle’s are sites that I personally visited.
- Triangles are 3rd party sites that were contacted.
- Purple lines are the worst type of tracking (3rd party cookies).
I was amazed by how many sites were contacted even when I only visited a couple blogs and a couple technical sites in my month trial. Colleagues sending links usually ended up being the worst (mostly news sites with 10 trackers, which send 3rd party cookies. Checkout the big circle above YouTube, that was a ‘news’ site). WordPress blogs were also pretty bad, usually having a different CDN for each different plugin. Full disclosure, each CDN sub domain would be classified as separate 3rd party sites. Checkout the GitHub on the left side for an example of this.
I’ve never really liked sites which includes external dependencies, or external systems (oAuth/SSO is a grey area but I’ll come to that in a different series). So I wanted to make sure that there was no external dependencies for my comment system, and I could host it myself.
With my requirements I’ve decided to go down the path of using [Ghost] for my blog with a modified Casper version to remove and Isso for my comment system, which you probably already guessed.
Alternative Comment Systems that someone can use if they don’t mind sending their users information to a 3rd party:
- Google+
- Requires a user to login via their Google account. Which means google has even more information about the user, and then will tailor the advertisements from their double-click platform to you.
- Facebook
- While Facebook integration is a possible way to increase users to your site it also has the same issues as Google. As a Facebook user, you have already given all your information to Facebook, why do you need to tell them your commenting on Slowb.ro’s Blog as well?
- Disqus
- Requires users to remember their username and password for another service…
- Why do we need comments as a service?
- ui-comments
- I only include this one as it has an npm package and would go great with ghost which is nodejs. But ui-comments is only for angularjs bindings and as such, cannot be used with ghost.
Installing Isso on our server:
The official install instructions for your server are located here. Re-iterating how to install it would be pointless when the Install instructions are easily laid out and easier to follow. I’ve decided to dedicate this section to some helpful tips in making it a painless experience.
- Do not think you need to skip using a virtual environment, it is a lot easier and you will thank everyone later.
- Example of my production isso.conf file contains most of the default configs that will help you get your comments up fast.
- Make sure all directories exist.
- Example init files to auto-start isso on (re)boot of your server
- Make sure Line 27 matches your Nginx configuration.
- If you are not using systemd, and used the “init” file above, it uses gunicorn to act as a http endpoint for our service. So:
isso <-over a socket-> gunicorn <-http port-> nginx
- Make sure you
pip install gunicornif you go down this road.
- Example of an nginx configuration for proxy passing
- Use this by
include conf.d/isso_nginx.confin yourserver { }block, (assuming you are running gunicorn on port 8000.
- Use this by
- You need to decided on what your isso endpoint will be, example:
- comments.example.com or
- example.com/comments/ or
- example.com/api/isso/ or whatever.
Update 2022: There is an option to completely skip nearly everything above, and install Isso via a docker container which are are actively using.
Integrating Isso with Ghost:
Once you have completed installing Isso on your server, and successfully created a config file and an init file. Start up isso in debugging mode, by running: isso -c /path/to/isso.cfg run
Following on now will assume you have installed Isso and everything is working smoothly. Integrating Isso into ghost is actually the easiest, and painless part of the configuration. As defined in the integration documentation, its just 2 lines of code to show the comment form.
Add Isso comment form to your posts and pages:
- Step 1, We reference the embed.js file into our post.hbs file under
./content/themes/-theme-/
Add the {{#is}} block after the </section> and before our <footer> and make sure to replace all references to your isso configuration. This will make sure that only “Posts” and “Pages” have comments on them. So you don’t have comments on the front page or the author pages.
            {{content}}
        </section>
        {{#is "post, page"}}
        {{! If your isso config is not on the same domain as your blog, you need to include data-isso variable }}
            <script data-isso="//yourdomain.com/isso/" src="//yourdomain.com/isso/js/embed.min.js"></script>
            <section id="isso-thread"></section>
        {{/is}}
        <footer class="post-footer">
And that’s it. (See how easy that was?). Hopefully your ghost blog should look like this when you visit a post or page.
Optionally, Add the amount of comments to your posts:
- Step 1, We reference the count.js only on the index pages.
So in your theme directory ./content/themes/-theme-/ edit the file named default.hbs and add the following with your domain information before the ending </body>.
    {{#is "index, paged"}}
    {{! If your isso config is not on the same domain as your blog, you need to include data-isso variable }}
        <script data-isso="//yourdomain.com/isso/" src="//yourdomain.com/isso/js/count.min.js"></script>
    {{/is}}
</body>
- Step 2, Add the link to each of the posts, which is generated in the
./content/themes/-theme-/partials/loop.hbsfile.
Before </footer> edit it so it looks like the following:
        <a href="{{url}}#isso-thread">Comments</a>
    </footer>
</article>
{{/foreach}}
If everything went right, you should see the following next to your author.

Once you have completed the integration to your ghost theme, kill your debug session and run /etc/init.d/isso start or service isso start depending on your init system to finish your integration.
Conclusion:
Now (hopefully) you have a comment system which cares about your users online privacy. Check out lightbeam or load up developer tools in your browser of choice, and check out what your browser is requesting when you reload the page on this site. (If there is more than my domain slowb.ro, feel free to let me know in the comments, because otherwise… I’ve failed)
While running your own services is a lot harder than maintaining a blog, and adding Isso comments requires you to have a little bit more knowledge than a regular blog user, but I would definitely recommend people trying to work out and install Isso. Caring about user’s privacy should not have to be forced upon the users to take action. It also falls upon server operators to implement features to reduce the amount of data they gather from them.
In the future with micro services, and unikernels I believe services will be even easier to install and maintain. That’s why I am currently trying to create an Isso comment patch for ghost, which will be in part 2 of this series once it’s done. Hopefully it will make it easier for people to enable comments on their blogs without having to make changes to source code, which make updating your theme, or updating ghost a nightmare. Right now, anyone that makes any changes to their theme, and then tries to update, has to reapply all their changes. So bookmark this page if plan on doing an update, and always backup your files first!
End Note: To the people who are testing the comment system. I have had to turn moderation on, due to the amount of ‘test’ comments. Feel free to continue testing it! (But all the ‘testing’ comments will be probably deleted)